Reference Lesson 1: Bresenham’s Line Drawing Algorithm · ssloy/tinyrenderer Wiki (github.com) 从零构建光栅器,tinyrenderer笔记(上) - 知乎 (zhihu.com)
课前准备 将model.cpp model.h tgaimage.cpp tgaimage.h geometry.h 从第一课的代码快照(WIKI中的here)中找到并且复制到一个空的C++项目中。
开始上课 现在,掠过一遍老师的代码,我们可以发现,本课程的渲染是画在一张TGA图片中。
并且可以知道如何创建一张TGA图片:
1 TGAImage* image = new TGAImage (800 , 800 , TGAImage::RGB);
如何在图片上绘画:
1 bool TGAImage::set (int x, int y, TGAColor c)
那么下面我们可以开始了,本节课的目的:画一条直线。
我们先绘制三个点起点、中点、终点 :
1
2
3
4
5
6
7
8
9
void line (int x0, int y0, int x1, int y1, TGAImage& image, TGAColor color) image.set (x0, y0, color); image.set ((x0 + x1) / 2 , (y0 + y1) / 2 , color); image.set (x1, y1, color); }
进而我们可以用线性插值:
1 2 3 4 5 6 7 for (float i = 0 ; i < 1 ; i += 0.1f ){ float x = lerp (x0, x1, i); float y = lerp (y0, y1, i); image.set (x, y, color); }
但是,由于上线性插值 无论线段长度是多长,绘制的点数是固定 的所以 多余了性能消耗,所以可以用函数绘制:
但是要注意,当t大于1时,x变量 过少,需要改为y为变量。并且,但用户输入的x0>x1 时,需要翻转两个点,我们参考老师的做法。
1
2
3
4
5
6
7
8
9
10
11
12
13
14
15
16
17
18
19
20
21
void line (int x0, int y0, int x1, int y1, TGAImage &image, TGAColor color) bool steep = false ; if (std::abs (x0-x1)<std::abs (y0-y1)) { std::swap (x0, y0); std::swap (x1, y1); steep = true ; } if (x0>x1) { std::swap (x0, x1); std::swap (y0, y1); } float t = (x-x0)/(float )(x1-x0); for (int x=x0; x<=x1; x++) { int y = y0 + t * (x - x0); if (steep) { image.set (y, x, color); } else { image.set (x, y, color); } } }
直到这里都还没有明确地说Bresenham算法 ,我们先简要地看下:
Bresenham算法是一种用于绘制直线的算法,它非常高效。想象一下,你要在一个栅格图上画一条直线,但你只能在栅格交叉点上画点。Bresenham算法就是告诉你如何在这些点之间画一条近似直线的方法。
算法的基本思想是:对于给定的两个点,我们选择一个初始点 ,然后决定下一个点应该是在水平方向还是在垂直方向 上,以便尽可能地接近所需的直线路径 。这样我们就可以一步一步地在栅格图上绘制直线,而不需要像画笔一样从点到点来绘制。
具体来说,算法首先计算出直线斜率 ,然后根据斜率的大小决定在水平方向还是垂直方向上进行步进。通过在步进过程中智能地调整误差 ,我们可以确保绘制的直线尽可能接近真实的直线路径,而且效率很高。
下面看下具体实现:
1
2
3
4
5
6
7
8
9
10
11
12
13
14
15
16
17
18
19
20
21
22
23
24
25
26
27
28
29
30
31
32
33
34
35
36
void line (int x0, int y0, int x1, int y1, TGAImage &image, TGAColor color) bool t_more_than_1 = false ; if (std::abs (y0 - y1) > std::abs (x0 - x1)) { t_more_than_1 = true ; std::swap (x0, y0); std::swap (x1, y1); } if (x0 > x1) { std::swap (x0, x1); std::swap (y0, y1); } int dx = x1 - x0; int dy = y1 - y0; float derror = (float )dy/dx; int error = 0 ; int y = y0; for (int x = x0; x <= x1; x++) { if (t_more_than_1) { image.set (y, x, color); } else { image.set (x, y, color); } error += derror; if (error > 0.5f ) { y += y1 > y0 ? 1 : -1 ; error -= 1 ; } } }
如果你看不懂可以以一个正方形对角线 来举例,他每次 累计步长都是1 ,所以每次 都可以向上走一个格子 。
如果斜率小于1 ,要等到error 累计到0.5 ,也就是半个格子才能走一格。
所以,可以理解error为垂直方向上的增量 。
最后我们为了去掉浮点,在这个判断时if (error > 0.5f)左右乘以2:
1
2
3
4
5
6
7
8
9
10
11
12
13
14
15
16
17
18
19
20
21
22
23
24
25
26
27
28
29
30
31
32
33
34
35
36
void line (int x0, int y0, int x1, int y1, TGAImage& image, TGAColor color) bool t_more_than_1 = false ; if (std::abs (y0 - y1) > std::abs (x0 - x1)) { t_more_than_1 = true ; std::swap (x0, y0); std::swap (x1, y1); } if (x0 > x1) { std::swap (x0, x1); std::swap (y0, y1); } int dx = x1 - x0; int dy = y1 - y0; int derror = std::abs (dy) * 2 ; int error = 0 ; int y = y0; for (int x = x0; x <= x1; x++) { if (t_more_than_1) { image.set (y, x, color); } else { image.set (x, y, color); } error += derror; if (error > dx) { y += y1 > y0 ? 1 : -1 ; error -= dx * 2 ; } } }
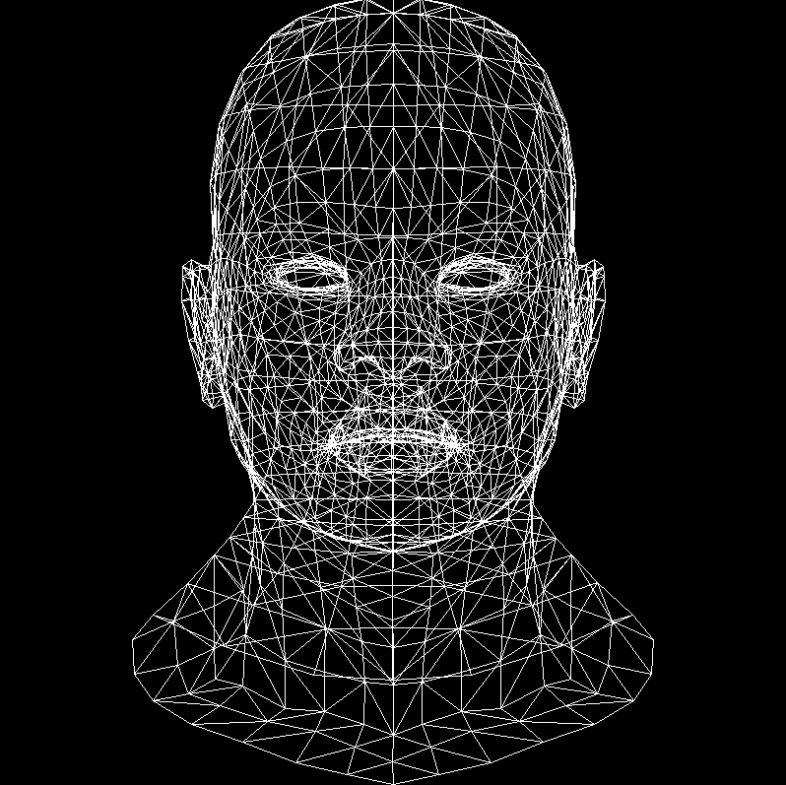
最后绘制模型:
1
2
3
4
5
6
7
8
9
10
11
12
13
14
15
16
17
18
19
20
21
22
23
24
25
26
27
28
29
30
31
32
33
34
35
36
37
38
39
40
41
void loadm_model (Model* model, int width, int height, TGAImage* image) for (int i = 0 ; i < model->nfaces (); i++) { std::vector<int > face = model->face (i); for (int j = 0 ; j < 3 ; j++) { Vec3f v0 = model->vert (face[j]); Vec3f v1 = model->vert (face[(j + 1 ) % 3 ]); int x0 = (v0.x + 1.0 ) * width / 2.0 ; int y0 = (v0.y + 1.0 ) * height / 2.0 ; int x1 = (v1.x + 1.0 ) * width / 2.0 ; int y1 = (v1.y + 1.0 ) * height / 2.0 ; line (x0, y0, x1, y1, *image, *white); } } } int main (int argc, char ** argv) TGAImage* image = new TGAImage (500 , 500 , TGAImage::RGB); Model* model = new Model ("african_head.obj" ); int height = image->get_height (); int width = image->get_width (); load_model (model,widthmheight,image,white); image->flip_vertically (); image->write_tga_file ("output.tga" ); delete model; delete image; delete white; delete red; return 0 ; }
